Monday 28 December 2015

Up Up & Away!

When you think you have seen every type of "super hero" imaginable, I hope my layout brings you a pleasant surprise. My little nephew had the most adorable hick ups (regularly) when he was a newborn and I made this page to honor his cuteness.


Directions:
1. Select two sheets of cloudy sky paper for the background. Matte the central photo on blue cardstock and then arrange the photos on yellow cardstock.

2. Cut frames for three small photos using red and blue cardstock. Next, fussy cut three comic style exclamations from the hero paper and arrange around the layout.

3. Create a city skyline by making a row of sky scrapers along the lower edge. Adhere clouds and sun to the upper portion of the layout. Incorporate the journaling into the layout by adding it to one of the clouds. When adhering the buildings and clouds, mount some of them on foam tape to create depth.

4. Finally, embellish the layout with an eye-catching scattering of arrows and stars across the two pages. Use a star shaped paper punch to make star embellishments from coordinating paper. Lastly, embellish the layout with additional items like puffy stickers, die cut shapes, and rub on transfers.

Supplies: ColorWays Celestial 12" scrapbook paper (Paper House), Happy Birthday Boy 12" scrapbook paper (Paper House), Baked With Love 12" scrapbook paper (Paper House), Sapphire Accent Pack (Paper House), Be Happy Rub On Transfers (Paper House), Explore Puffy Stickers (Paper House), city buildings paper (Fido #1739 - GCD Studios), chipboard star, mini star paper punch, charm, black permanent pen

A Closer Look:


TIP: I especially enjoy using arrows as embellishments as they add a sense of movement and direction to the layout. Having an embellishment extend through both pages helps to link them and systematically lead the viewer's eye around the layout.

Visit Paper House to see their whole range of coordinating papers & embellishments.

Tuesday 15 December 2015

Craft Ideas Magazine (Winter 2015)

The latest issue of Craft Ideas Magazine (Winter 2015) has just hit the shelves.  You will be thrilled to find tons of cute Christmas cards, holiday home decor, and handmade gift ideas. There is so much inspiration all packed into 100 pages with step by step directions and loads of tips. There is also a huge section devoted to the arrival of little ones and decorating the nursery using a jungle animal theme.

Look for my cards on page 55, 81, & 82.

Visit CraftIdeas.com for more inspiration.

Thursday 10 December 2015

Tag - Gift Card Holder

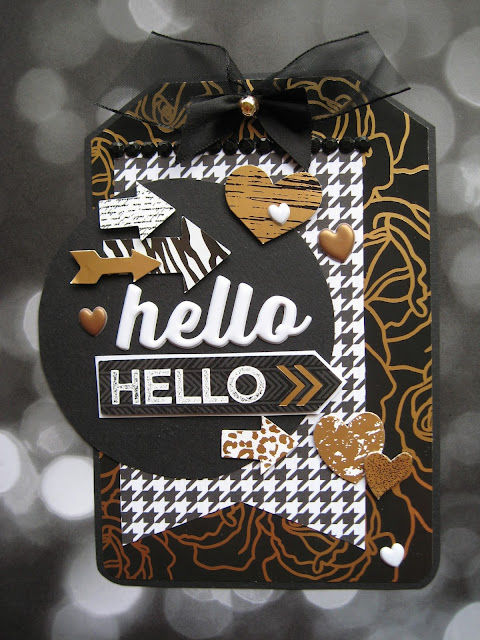
Hi, Today I'm sharing some little tag shaped cards. Actually, they are the perfect size to be used as a gift card holder. The ColorWays line coordinates so easily, that when you are using a sketch, they come together in no time at all.  Keep this gem of an idea in your back pocket just in case you need that last minute any occasion gift.

TIP: Use design sketches for inspiration but don't feel restricted to follow them exactly. For the black tag, I reversed the sketch. My placement of embellishments was also different to the sketch because the sentiment took up more space. Some elements of the design, you may choose to completely leave out. Use the sketch as a guide but let your creativity flow to make it your own creation.

A Closer Look:
Title: Hello Hearts 
Supplies: ColorWays Noir Birchwood 12" scrapbook paper (Paper House), ColorWays Noir Accent Pack (Paper House), Explore Puffy Sticker (Paper House), Scrapbook Generation September 2015 Tag Sketch (Debbie Sanders), black cardstock, organza ribbon, black gems, hole punch, gold bead, needle & thread


A Closer Look:
Title: You Make Every Day Happy
Supplies: ColorWays Sapphire Accent Pack (Paper House), Sapphire Trim Cards 12" Colorways Scrapbook Paper (Paper House), Explore Puffy Sticker (Paper House), Enjoy Puffy Sticker (Paper House), Scrapbook Generation September 2015 Tag Sketch (Debbie Sanders), navy blue cardstock, hole punch, blue ribbon

Directions:
1. Follow the sketch by Scrapbook Generation CREATE Magazine (Debbie Sanders - September 2015)

2. Cut a piece of cardstock for the tag base and select two coordinating papers for the circle & bunting shape.

3. Next, arrange the sentiment and embellish the tag with puffy stickers, die cut shapes, gems etc.

4. Finally, punch a hole through the center of the top of the tag. Add a bow or tie a piece of ribbon through the hole.

Visit Paper House Productions to see their whole beautiful range of coordinating papers & embellishments.