Showing posts with label Mini Album. Show all posts

Friday, 9 December 2016

Snowflake Village Accordion Book - Joggles DT

Today on the Joggles Blog I am sharing a quaint little Snowflake Village that I created using a Joggles Accordion Book and Joggles Wonky House Stamps. If you love paper dolls, then you will love this wonderful display that is perfect for the mantel or your holiday dinning table.  The best part is that you can set up the village houses differently every time you put it up. You won't want to miss full directions for my Snowflake Village and a step by step tutorial of how I created this breath taking background and festive little houses.

Let me tease you with a little peek!


Joggles Supply List:
Joggles Accordion Album 7x5", Joggles Stencil - Endless [20-33744], Joggles Cling Mounted Rubber Stamp - Wonky House #8 [33675], Joggles Cling Mounted Rubber Stamp - Wonky House #9 [33682], Joggles Cling Mounted Rubber Stamp - Heart Tree Small [33648], Joggles Clear Acrylic Stamp Mounts, Ranger Heat It Craft Tool, Inkssentials Non-Stick Craft Sheet, Inkssentials Mini Mister, Aleene's Original Tacky Glue, Ranger Texture Paste, Inkssentials Glossy Accents Dimensional Clear Glaze, Inkssentials Crackle Accents Dimensional Clear Glaze, Versamark Watermark Clear Ink Pad

Thanks for visiting & Happy Crafting!

Wednesday, 10 February 2016

Dance in the Rain - Linnie Blooms


A small rainbow canvas to brighten your day!


Directions:
1. Apply blue gelato to the canvas background. Add a spritz of water to help blend the color with a paintbrush to create a splotchy background. Set aside to dry.

2. Use permanent black ink to stamp a quote onto clear shrink plastic. Punch a small hole at the top using a hole punch so that you can hang the charm. Use a heat gun to shrink the stamped quote.

3. Apply, white texture paste to the canvas and use texture card #5 to make horizontal striations to form the rain. Allow to dry. Next, add a cloud like mound of texture paste to the top of the canvas. After the paint has dried, apply Glass Bead Glitter Gel to add sparkle to the clouds.
4. Next, use gelatos to color the rain in a rainbow pattern. Dip the paintbrush in water to help spread the colors. Lastly, when the paint has dried, apply Glass Bead Glitter Gel selectively through a limited scattering of spots while holding the dot stencil securely.

5. Finally, embellish the rainbow with translucent buttons and hang the shrink plastic charm from clear thread.

Supplies: canvas mini album (Linnie Blooms), Gelatos - Watermelon, Guava, Peach, Butter Creme, Kiwi, Elderberry, Fig, Strawberry, Acqua Dolce (Faber-Castell), Glass Bead Glitter Gel (Faber-Castell), Texture Card #5 (Faber-Castell), Stencil 101 Collection dots (Faber-Castell), clear shrink plastic (Shrinky Dink), Stazon black ink (Tsukineko), Life clear stamp (Kaisercraft), heat gun, water, paintbrush, texture paste, clear thread, hole punch

A Closer Look:
 
Visit Linnie Blooms
to see their range of wonderful canvas based products to embellish.

Monday, 21 September 2015

Faber-Castell & Linnie Blooms Blog Hop

Faber-Castell & Linnie Blooms
Faber-Castell & Linnie Blooms products are a mixed media match made in heaven!  So we decided to swap products and spend the week sharing all of the great items the Design Teams have created! Please be sure to follow both company’s blogs so that you don’t miss a thing! Go HERE for a complete list of participating Designers.
My project is a mini layout of my little nephew, Colin.

Faber-Castell Supplies:

Directions:
1. Before you begin, protect your work surface or work on a craft mat. Apply two shades of blue gelatos (Elderberry & Acqua Dolce) randomly across the entire canvas page. Use a wet paint brush to spread and blend the colors adding more water as needed. Continue adding color until you are pleased with intensity. Dry with a heat gun. Using permanent ink, randomly stamp newsprint definitions around the entire background. Place a stencil onto the background and while holding it firmly, apply texture paste through three distinct and separate areas. Set the canvas aside to dry.
2. Apply Elderberry Gelato to the edge of each pennant flag. Blend towards the center with a wet paint brush so that the color is more intense on the edge and gradually lightens in the center. Set aside to dry or dry the flags with a heat gun. Poke two holes in the top corner of each pennant and set an eyelet in each hole. Apply adhesive letters to the flags and then thread the pennant flags unto a piece of baker's twine.

3. Color and shade the canvas star yellow using Stamper's Big Brush Pens. Paint the inside of the star with Light Yellow and apply the darker shade Cadmium Yellow only along the edges. When the star has thoroughly dried, apply Glass Bead Glitter Gel along the edge.  Next, cut out a small heart from white cardstock and apply Glass Bead Glitter Gel to it. Set aside to dry. 

4. Attach the photo inside a chipboard frame and hang the string of flags along the lower edge by adhering the twine to the back of the frame. Embellish the layout with arrows, a large tag, a heart & a small duckie. Attach four buttons in the corners of the page and tie ribbons at the ends of the string of flags.
Linnie Blooms Supplies:
canvas mini mixed stitch book
, canvas large star, canvas small pennants
Faber-Castell Supplies:
Gelatos
(Elderberry, Acqua Dolce), Glass Bead Glitter Gel, Stencil 101 Collection (chevron), Stamper's Big Brush Pens (Light Yellow 104, Cadmium Yellow 107), 
Other Supplies:
Stazon black ink (Tsukineko), Love & Joy definition clear stamp (Handcrafted Card Co), Colorways Sapphire Trimmings 12" scrapbook paper (Paper House), water, paintbrush, texture paste, organza ribbon, eyelets, eyelet setter, baker's twine, chipboard frame, tag, buttons
                                              Visit the Linnie Blooms shop HERE.
                                       Visit the Faber-Castell shop HERE.
 Make sure to leave your comments as you hop so that you are sure to be entered in the drawing for some fantastic Faber-Castell & Linnie Blooms products!
A Closer Look:
Thanks for visiting!

Monday, 27 July 2015

Canvas Sunflower- Mini Album Cover Embellishment

canvas sunflowers + inking + rubber stamping = lots of fun
This little denim album was one of those projects (and we all have them) that got left incomplete and abandoned when creativity took me in another direction. It was too plain for me to leave it just denim and I didn't know how to embellish it until I made this really easy canvas sunflower for the finishing touch.  Let me show you how I made it.

Directions:
1. Coloring the Canvas: Iron all the canvas pieces. Prepare your work surface & protect your hands with disposable gloves. Place the canvas sunflowers on your craft matte or newspaper. Using a sponge applicator to apply Distress Ink to color the sunflower and apply strong pressure to allow the ink to absorb into the weave of the fabric. Remember to color both sides of the canvas flowers as they will be folded to construct the 3D flower. Set flowers aside to dry thoroughly or give them a bit of help and dry them with a heat gun. Color the canvas leaves with Distress Ink. I suggest applying multiple shades of green & yellow ink to the leaves unevenly (aka splotchy) in order to give the leaves a more realistic appearance.
 
2. Stamping the Design: Use permanent ink to stamp a background pattern to the canvas sunflowers and leaves. Remember to stamp details to both sides of the canvas flowers as they will be folded to construct the 3D flower. I used a wood grain stamp to cover the petals.

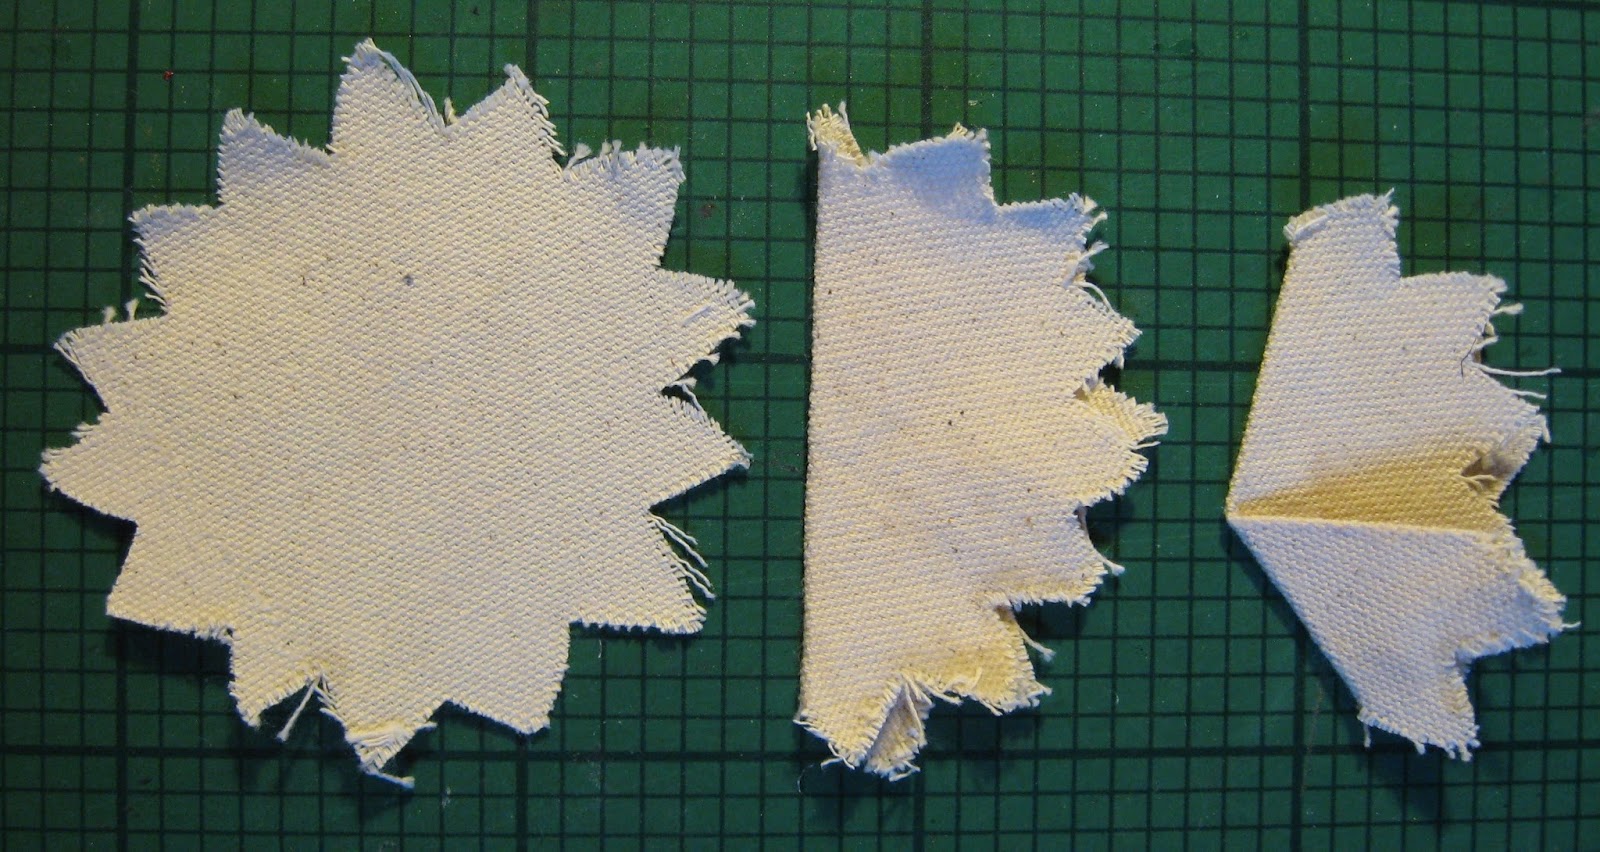
3. Folding:
  (you will need 3 canvas sunflowers)
Fold the sunflower canvas in half and press with your fingers while holding it for 20-30 seconds to set a mild crease in the canvas. Next, fold 1/3 of the folded sunflower over to form a small petal. Repeat the process of folding for the remaining two canvas sunflowers. You should have three identically folded pieces which when laid side by side form a complete circle.    
 

 4. Sewing: Use a needle and thread to tack the fold at the center and stitch it securely to prevent it from unfolding. Repeat the process of securing the fold for all three canvas sunflowers. Next, begin stitching the petals together at the center point to form the sunflower. There is no need to overlap because the three segments will form a circle when joined. Finally, embellish the center of the sunflower with a button and attach the canvas leaves to the underside of the sunflower. (Optional: If desired, sew a ladybug button on the sunflower.)

5. Inking the Edges: When the sunflower is stitched and assembled, use a sponge applicator to apply Distress Ink to the tips of the petals to add depth and dimension to the sunflower. (Vintage Photo & Spiced Marmalade)

6. Assemble the Project: Glue or stitch your sunflower to embellish your chosen item. You may embellish a candle holder, a gift bag, a hat, or a journal cover...etc.

A Closer Look:

Linnie Blooms Supplies:
canvas sunflowers, canvas leaves
Other Supplies: Distress Inks (Peeled Paint, Mustard Seed, Vintage Photo, Spiced Marmalade) -Ranger, sponge applicator, StazOn brown ink (Timber Brown) -Tsukineko, woodgrain clear stamp (Architectural Accents) -Tattered Angels, Papermania leaf clear stamp -Docrafts, wooden button, needle & thread, glue gun, iron

Stop by Linnie Blooms to see the amazing selection of canvas die cuts
and don't forget to follow Linnie Blooms on Facebook.