Wednesday, 24 June 2015

New Arrival Card

Today I am sharing my new arrival card using some of the bits from the ColorWays Sapphire Accent Pack. The cute moon and stars with silver foil highlights were just what I needed to complete my card. These embellishments are very versatile as they can easily be used for scrapbooking as well as cardmaking.

This project appears in Scrap n' Art Magazine (Sept 2015)

Directions:
1. Use the light blue polka dot matting and double mount it on white and blue cardstock. Adhere it on a white card base. Attach two strips of striped paper along the sides and trim away excess.

2. Stamp the hot air balloon using StazOn black ink onto white cardstock and also onto transparency. Paint the balloon & basket with watercolors. Embellish the balloon with gems and use a white gel pen to add details & highlights.   Carefully cut out both balloons.  Assemble the paper balloon & basket on top of the intact transparent balloon image with foam tape.

3. Next, emboss clouds on white cardstock. Cut them out and attach them overlapping with some mounted on foam tape. Add the moon and star accents to the design (make sure to leave enough space for the sentiment)

4. Finally, adhere the rub-on sentiment and embellish the card with a sprinkling of tiny silver star stickers.

Supplies: ColorWays Sapphire Accent Pack - Paper House, Sapphire Mini Trim Cards 12" scrapbook paper - Paper House, Seek Beauty Rub-On Transfers - Paper House, Hot Air Balloon rubber stamp - INCA Stamps, StazOn black ink -Tsukineko, transparency, cloud embossing folder -Embossalicious, watercolor paint, white gel pen, white & blue cardstock, gems, silver stars stickers

Stop by Paper House to see their whole range of wonderful ColorWays accents & rub-on embellishments.

Friday, 19 June 2015

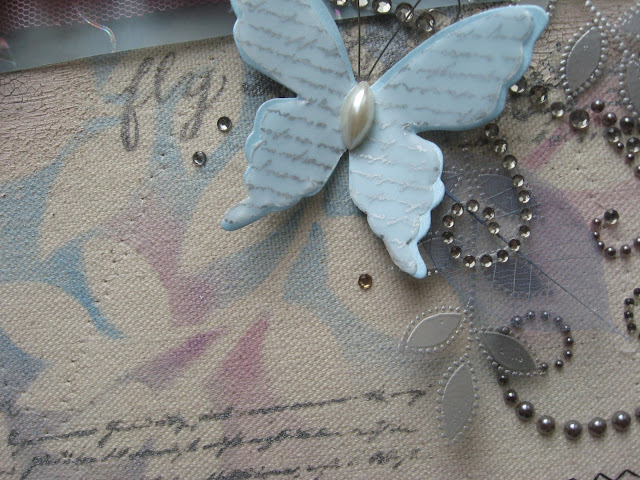
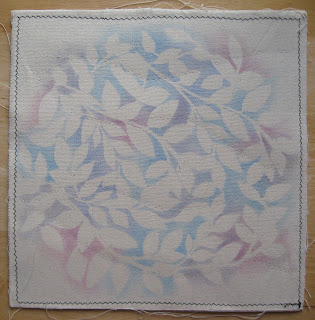
Stencilled Leaf Background


Creating a whole background is such a completely satisfying process. Without relying on pretty patterned paper for the layout, anything is possible. I am the first to admit, a blank 12' canvas can be a bit intimidating but also so exciting. It was a time consuming layout only for the reason that I had so many choices of products and stamps. I felt a bit overwhelmed by the freedom to choose anything. My best advice, "just go for it." I just had to start even though I didn't know exactly where my project would end up. I do things backwards to most scrapbookers because I didn't pick the photo for the layout until I was over half way done. That is just how I work sometimes; when I am consumed by colors and embellishments and my focus is not storytelling.

A Closer Look:
 
 
 Directions:
1. Prepare the canvas by securing the stencil to the canvas in 5-6 spots using double sided tape. Spray 1-2 squirts of mist (because a little goes a long way) and while firmly holding the stencil, work the paint into the canvas with a sponge applicator. Continue to apply additional colors and blend.


2. Next, dry emboss white cardstock with a damask pattern and then apply Distress Ink on the raised image. Tear one edge of the embossed paper and then brush on a generous swipe of Crackle Paint so that it just peaks out the sides when the photo is attached. Allow it to dry thoroughly before mounting the photo on the embossed card. Tear one edge of the velum paper and mount the photo cluster onto it.

3. Stamp the Vine Silhouette image onto cardstock with Versamark ink, sprinkle embossing powder, and heat emboss. Cut the embossed image in half, tear both edges, and adhere it vertically behind the photo cluster.

4. After the canvas is dry, prepare your stamps using an acrylic paint dabber. Stamp randomly over the misted canvas with three different images. Remember to check to see that the stamp is evenly inked and look for any excess ink that should be removed so that it doesn't spoil the impression. Also, you may like to dab your finger along the outer edges of the stamp to lighten the applied ink so the image will have a gradual fade out and a more distressed look.

5. Finally, (the best part)...embellish the layout with rose trim, lace, butterflies, gems flourishes, charms, chipboard bird, and a title or quote. I stamped leaves onto transparency and embossed them in silver.  Lastly, I stamped a quote onto transparency and heat embossed it with silver powder so that I had the ability to place it on the layout over dry embossed textured paper that would have been impossible to stamp on directly.  To finish off the layout, lightly dust the edge of the canvas with a hint of pink chalk.

TIPS: If you feel nervous or uncertain about the placement of the stamped images, stamp your chosen design on scratch paper multiple times. Cut them apart and use them to plan your stamping to see what works. Try different arrangements before taking the big leap to stamp directly on the canvas. Keep in mind that, using 3 repeated designs in a triangular formation around the focal point is the ideal number for balance, as groups of odd numbers are the most appealing. If you still can't decide between placements, you can photograph the different layouts to compare them on the computer screen side by side. This takes the guess work and uncertainty out of stamping so you can get back to creating. By taking a few moments to do these preparations, you will be happier with the final result.

Supplies: 12x12 Canvas Scrapbook Page (Linnie Blooms), leaf vine stencil (Prima), Perfect Pearls Spray Mist - pink/teal/lavender (Ranger), silver acrylic paint dabber (Ranger), damask embossing folder (Darice), Distress Ink - Tattered Rose (Ranger),  Crackle Paint - Tattered Rose (Ranger), Script Border stamp set (Heidi Grace), Flourish Script stamp (Ditto), Silhouette Spray stamp - N180 (Stampendous), Fern Background stamp (Posh Impressions), Possibility stamp - Tim Holtz (Stampers Anonymous), VersaMark ink (Tsukineko), Pearl & Silver embossing powder (Stampendous), chalks (Inkadinkado), blush rose trim (American Crafts), heat gun, vellum, transparency, butterfly embellishments, skeleton leaves, chipboard, gems, charms

Stop by the Linnie Blooms Shop to see their whole range
of ready to decorate canvas shapes & home decor items.

Tuesday, 16 June 2015

ColorWays Accents Packs!

Paper House has created these adorable little Accent Packs to go with the new Colorways line. Each Accent Pack includes a great mix of 4x6 cards, 3x4 cards, frames, and die-cut shapes. (42 pieces total!) Each piece is double sided and has hints of metallic foil too.


Thursday, 11 June 2015

Tutorial- tissue impression

Instructions: How to make a tissue impression embellishment


Supplies: spray bottle  cutting matte  Napkin Podge   rubber stamp
                    
tissue             wire rack       acrylic paint     mounting block

1
. Fold:  Fold 1 tissue in half and place it on your work surface. (You have 2 layers)
2. Moisten: Mist the tissue with water until completely moistened (2-3 sprays) Add another folded tissue on top of the wet one and spray it. (You now have 4 layers)
 
3. Assemble the Stack: Fold the tissue stack in half. (You have 8 layers)  If you need a bigger stamping surface, don't fold the tissues. Alternate layering and spraying 8 tissues.

4. Compress: Use a clear mounting block to gently press the wet tissue together until they become bonded. If you don't have a clear mounting block, use a plastic box lid or CD case for pressing. The tissue should lay flat with only small creases visible and resemble handmade paper with a subtle texture. Be careful not to over-flatten the wet tissue as it needs to remain spongy so that you can press the stamped image into it. Carefully remove the pressing tool from the wet tissue. (Don't worry! if the top layer tears. If it becomes too damaged you can remove it and still have plenty of layers left.)
5. Stamp: The surface is now ready for the image. Select a stamp design with a simple shape. It should be something solid with few tiny details. Next, press your stamp into the moistened tissue stack. Firm pressure is needed to get a deep crisp image. Stamp repeatedly until you fill the moistened tissue with as many impressions as you need.
 
6. Apply Product: While the impression is damp, cover the tissue impression with Napkin Podge. I found the best tool to spread the Napkin Podge was to simply use my finger. It will take about 24 hours to dry completely but I helped mine dry faster by placing it above the radiator on a baker's wire rack.
 
7. Cut & Color: Tissue is easily trimmed with scissors so that simple shapes can be cut out instead of framed. Acrylic paint can be applied to color your impression to match your project.

TIP:
If the rubber stamped image is not deep enough to be visible you may have...
1.) chosen a stamp with too much detail or
2.) not pressed firmly enough into the wet tissue with the stamp or
3.) compressed the wet tissue too firmly in step 4 so simply start again and
      build a new wet tissue stack.

Wednesday, 10 June 2015

Wood You Be My Baby?

When I saw the wood paper with wonderfully weathered frames scattered on it, I knew it would make the perfect background to share my nephew's first month. I selected black & white photos and only one single colored photo to draw the focus.  Three of the frames were completely cut out and re-assembled with foam tape for a more dramatic 3D effect. Instead of filling all the frames with photos, two of them hold an embellishment.  Finally, I made some mini flags from ribbon and washi tape to cluster around the main photo.

A Closer Look:
 
 
Directions:
1. Use the PH 12x12 Woodgrain paper as the background. Cut out the centers of all the frames with a craft knife. Carefully align photos in three of the openings and adhere the photos to the back of the layout.

2. Assemble two non-photo frame inserts to emphasize your theme. Completely cut out the last three frames. Next, attach the layout to a sheet of scratch paper to add stability to the layout.

3. Fill the remaining loose frames with photos or themed diecuts. Embellish each frame with ribbon and re-attach it with foam tape. Wrap ribbon around one frame. Tie a simple knot and attach a charm around another frame and for the last frame, add a decorative bow.

4. Finally, embellish the main photo with a cluster of mini flags.

Supplies:
12x12 scrapbook paper - PP-0038E - Generations, washi tape, ribbon, charms

Visit Paper House to see their whole range of themed papers and embellishments.


Come back tomorrow to learn how to make an impression embellishment from
facial tissues! (a sure money saver)


Monday, 1 June 2015

Linnie Blooms - Canvas File Folder


Today I'm sharing my scrapbook layout using a Canvas Mini File Folder by Linnie Blooms. I used the file folder as a matting to add softness to my nephew Colin's one month old birthday layout.  I chose a chalkboard background and vintage toy embellishments to bring it all together. Some of my most favorite layouts have been ones with lots of layers and different textures. I think the distressed canvas perfectly compliments the vintage feel of this layout. I love those little frayed edges and the zig zag stitching is done for you. It was sew easy!!!

A Closer Look:

Directions:
1. Lightly dust the edge of the Canvas Mini File Folder with brown and grey chalk to distress the fabric and give it an aged appearance.
2. Matte one photo with paper and attach the other to the file folder.
3. Assemble the title on 2 flags and use twine to hang a small tag from the corner of one of the photos.
4. Use a craft knife to slice the edge of the chalkboard/frame to tuck some accents along the bottom of the frame.
(Put foam tape along the upper edge of a few of them to give more dimension.)
5. Embellish the layout with chipboard stars.
6. Add faux chalk doodles and dust smudges to the background with a white pencil.
7. Use a white gel pen to accent your embellishments with dots or stitches. Finally, use a permanent pen to highlight a single important feature in the black & white photo. (On my BW photo, I colored the word "one" in yellow.)

Linnie Blooms Supplies: Canvas Mini File Folder
Other Supplies: white pencil, white gel pen, chalk, scrapbook paper, embellishments, chipboard, stars, alphabet stickers, twine, craft knife

Visit the Linnie Blooms Shop to see more of their wonderful range of canvas products and stop by the BLOG for great inspiration from the LB Design Team.