Showing posts with label Mixed Media. Show all posts

Wednesday, 4 May 2022

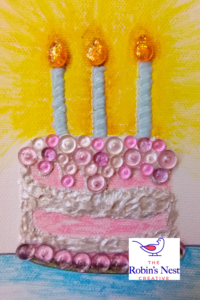
Cute Birthday Cake

It was so easy to create a cute birthday cake using Robin's Nest Creative Canvas.  They give you the perfect jumping off point if you are like me and lack the talent to draw.  Apply glitter glue to the Tear Dew Drops to add that extra sparkle to the candle flames.  Come with me over to The Robin's Nest Blog HERE to see the complete tutorial.

This project is submitted into the following challenges...
 
Love to Scrap Challenge Blog
Mix It Up Challenge Blog
Polkadoodles Week 18
Moving Along with the Times #142

Supplies: 
Hyacinth Dew Drops & Orange Tear Drops & Birthday Cake Canvas
paint brush, white pearl texture paste, Nuvo enamel paint, Distress wax crayons, glitter glue

Friday, 30 October 2020

Mythical Creatures

My little niece recently turned 3 and had a unicorn themed party.  So what else is a crazy aunt suppose to do but make her a unicorn wall art to hang in her room. It was great fun to create the mane and tail with texture paste.

http://
This project is submitted into the following challenges...

Mixed Media Academy "Mythical Creature" YouTube Hop Challenge

Splashy Mix October Challenge


We Love2 Create (Mixed Media Challenge)


Bleeding Art Challenge


Thanks for dropping in to say hi!

Wednesday, 7 October 2020

Dancer Layout

Hi Girls...I love all forms of dance so it was natural to use the feminine elements and sheet music in the moodboard to inspire me.  I added the window embellishment because it implies that sense of freedom of being your authentic self when you dance (especially when you are alone!).  The lace pattern is reflected in the curtains.  I painted the scrolled chipboard with silver acrylic paint and added micro-beads to add a lovely texture.
Check out all the hand stamped flowers in my layout.  I even stamped some onto organza fabric and used a needle and thread to cinch the center for more realistic layers.  I heat embossed the music notes onto acetate so that I would have less areas to fussy cut and also the sentiment so that I could move it around until it found a place within the design.  I challenged myself to use many patterns and I even stenciled some swirls onto the pattern background paper.  The bottom edge was distressed and rolled up to reveal the B side of the paper which has a red & white stripe.

This layout is entered into the following challenges...

Creative Embellishments Moodboard Challenge


Academy Scrap Art Moodboard Challenge

Bleeding Art Challenge (anything goes)


STAMPlorations (Stencil Challenge)


A Closer Look:


Supplies:
tools - needle & thread, edge distresser, heat gun, watermark ink pad,
embossing powder (silver & black), pearl white ink pad, white texture paste, paint brush, micro-beads, liquid adhesive (Best Glue Ever - ScraPerfect)
paper - black pattern paper, red mirror card, lace pattern paper, music sheet
stamps - sentiment (Tim Holtz), flower, spiral background (The Artistic Stamper)
embellishments - music note stickers & brads, wooden leaves,
pearl gems (Dew Drops - The Robin's Nest)
other: acetate, washi tape, mulberry paper,
red organza fabric, red glitter tulle, window die cut (49 & Market)


Tuesday, 29 September 2020

Let's Soar!

I created some stamped embellishments such as a newsprint flower, feather, butterfly, & bird.  The background paper had a subtle newsprint leaf design which worked perfectly.  I love that distressed wood grain paper. I even used some wood grain washi tape.


This layout is submitted into the following challenges...
More than Words September Challenge (books)

Creative Embellishments September Challenge


Monday, 28 September 2020

Resist Masking Technique

Hey Guys,
The background was created using a masking technique using petroleum jelly. (Vaseline)  I used my finger to smear petroleum jelly on select areas of the burgundy floral paper which served to mask it and protect it from paint.  Then I applied yellow acrylic paint with a brush directly to the remaining paper.  When the paint was dry, I carefully used tissues to remove the petroleum jelly.  This created a distressed irregular effect.  I like that it limited the visibility of the overpowering pattern.  This technique is only for the brave because it is a little unpredictable.  The final look depends completely on how you spread the petroleum jelly and the ratio of paint to pattern paper that is left exposed.  It is a bit of a gamble but well worth exploring.  (warning! it is a messy one!)


This layout is submitted into the following challenges...
Creative Embellishments September Challenge


Lasting Memories #517 (Hello Fall)

We Love 2 Create (anything goes mixed media)

Thursday, 6 August 2020

Urban Grunge Silhouette Scene

Hey Friends,
I really needed to create a manly birthday card but I was a bit nervous because I do normally struggle with it.  I began with my favorite tool, my heat gun to add the beautiful silver shine to the chain link fence.  If you want to learn how I created that lovely texture on the chipboard gears, you can see the step by step method I used to create the faux aged metal on the ScraPerfect Blog.  You can find the complete tutorial for my card HERE.
Essential Supplies:

This card is entered into the following challenges...

Color My Heart Color Dare #404

A Closer Look:
embossing powder (silver & black) / heat gun
Rubber Stamps - Urban SilhouetteMetal Screw 
Chain Link Fence & Birds on WireClocks (Blank Page Muse)
ink pad (black) / acrylic paint (silver & copper) / paint brush
Gathered Twigs Distress Ink & ink blending tool
chipboard gears (Creative Embellishments)
Silver Dew Drop Gems (The Robin's Nest)
Best Glue Ever (ScraPerfect)


Thanks for visiting!

Tuesday, 14 July 2020

Mixed Media Ballerina

Hey Guys,
Visit The Artistic Stamper's blog today to see my complete tutorial for this mixed media ballerina card.  Today is my final post as the July Guest Designer.


The Artistic Stamper Images:


Other Supplies:
cardstock (black, white)
transparency / pattern papers
ink pads (black, brown, watermark, silver, red)
heat gun, embossing powder (black, clear, red)
red gelato or watercolor crayon
silver acrylic paint / white texture paste
paint brush / ink blending tool / needle & thread
tulle / micro-beads / glitter glue
wooden window frame / washi tape / music note metal brads
silver gems (Dew Drops - The Robin's Nest)
liquid adhesive (Best Glue Ever - ScraPerfect)

Saturday, 28 March 2020

Love this Photo Layout

This photo is one of my most favorite because I was holding my newborn nephew at the time when my husband captured this moment. The rainbow lace background was created with fabric lace used as a stencil. After I attached strips of double sided tape to white card stock, I secured the lace down onto the tape.   I applied white glitter through the lace and tapped it down gently with my finger.  Then I shook off the excess glitter and carefully removed the lace.  Next, I strategically applied different colors of glitter over the design one color at a time to avoid cross contaminating the glitter.  Lastly, I added Dew Drops over the background to create a sense of joyful bubbly movement.

This layout is submitted into the following challenges...

Supplies:
white & black cardstock
glitter
lace
transparency
frame stamp
black permanent ink pad
Dew Drops (The Robin's Nest)
liquid adhesive

Thanks for visiting me!

Tuesday, 4 February 2020

Dusty Attic Butterfly Layout

I created this layout by applying a thick layer of texture paste and then pressing stamps into the design.  The large butterfly was a foam stamp and the smaller one was created with a Dusty Attic chipboard butterfly.  The chipboard was used as a tool to create the background and then I cleaned it off and saved for another project.  After the texture paste dried, I applied gelatos to create a blended background of lavender and pinks.

This layout is submitted into the following challenges...
Dusty Attic February Challenge

Splashy Mix Challenge


Mixed Media Academy (moodboard)


Creative Embellishments


The Artistic Stamper (words)
 

Wednesday, 27 November 2019

Falling Leaves Home Decor - Robin's Nest Design Team

It's the perfect time to update your home decor by making a unique piece of art for your wall or mantle. I was inspired by the moodboard to make a autumn family tree.  The full tutorial can be found HERE on the Robin's Nest Blog. 
Canvas Dew Drops Sets are a great jumping off point for those of us who can't draw. They come in numerous sizes from 5x7" to 24x36"  You can find all the different canvas designs available HERE.

This project is submitted into the following challenges...

Supplies:

permanent brown marker
clear gesso
clear crackle paint
spray mists (brown & gold)
paintbrush
liquid adhesive
green fuzzy trim
frame 5x7"


Thanks for stopping by!