Showing posts with label Practical Scrappers. Show all posts

Friday, 4 April 2014

Easter Blessings!

Easter Blessings!
I used Stazon ink and pearlescent water colors to color this cute little bunny sitting in the pansies.  Visit Practical Scrappers to find more Easter inspiration.

Friday, 28 March 2014

No Rectangles Allowed!

Think "OUTSIDE" the Rectangle

 The Challenge: Shaped Cards
The Details
1. a hinged door that opens
2. embossed brick texture
3. black kitty in the window
4. washi tape bunting flags
5. flower brads in the grass
Mission Accomplished!

FYI- I didn't have a kitty small enough to sit in a window of my house so I stamped a cat on black shrink plastic. He shrunk to just the right size to sit on the ledge.

Visit Practical Scrappers today to see how others went beyond the safety of the rectangular card base.

Tuesday, 25 March 2014

Trendwatch: Ombre


If you are unfamiliar with the term Ombre, according to scrapbooking legend Shimelle,  "Ombre is essentially a fade – it’s often a monochromatic look with one colour starting as a saturated hue and fading out to pale or white." 

I selected numerous green patterned paper scraps in varying shades to create my subtle ombre effect.  I scattered hexagons diagonally across the page arranging them in order from lightest to darkest.  Take a peek over at Practical Scrappers to find more ways to create the subtle ombre effect on your next project.


Tip: If you don't mind getting a bit messy, use mist, ink, or paint 
to create the faded and blended effect on paper.

Sunday, 16 March 2014

Baker's Twine


I used baker's twine to help guide the eye around this layout by simply draping it among the flowers and adding the occasional loop, knot, or bow. To bring attention to the central photo I placed vellum over the two side photos to mute the colors while still being able to see the image. This is a great trick to use if you have that less then perfect photo because the vellum can serve to camouflage any imperfections.

                                    For more inspiration, stop by Practical Scrappers.

Top Tip: Don't forget to tie simple knots at the end of the twine for the finishing touch.

Tuesday, 25 February 2014

Be Bold, Go Gold!

For me, gold is usually just an accent color that I use sparingly but for my card I challenged myself to use way more gold than I would usually be comfortable with. I started with a gold card base to give a massive impact. I continued the wow factor by using gold glitter covered mini leaves (ahhhh, I love those after xmas clearance bins) and a gold birthday message. I made the flower by stamping on organza fabric and stitching numerous layers together. The gold mini gems and fancy beaded gold stick pins were the perfect finishing touch. Remember, don't be afraid to be bold, go gold. Visit the girls over at Practical Scrappers and catch Gold Fever!

 Be Bold, Go GOLD!

Sunday, 16 February 2014

Brads, Eyelets & More, Oh My!

After stamping & embossing the bird onto transparency, I then attached it to the card base with three brads cleverly disguised as flower centers. Most crafters have a surplus of brads and eyelets sitting unused in little plastic containers. Take a look over at Practical Scrappers to see the many clever uses for these little metal cuties.

Top Tip: 
If you don't have the right color brad for your project, color them with permanent pen or embossing powder.

Friday, 7 February 2014

Celebrate Love

As Valentine's Day is approaching, I thought this engagement photo was the perfect one to choose to celebrate the day of love. I used a brick background stamp, a bit of splattering, and added some washi tape folded into zig zag strips. I was thrilled with the rick rack frame encircling the focus photo. The final addition of a tiny photo inside a bottle cap frame finished off the layout beautifully. For me, this will probably be one of my all time favorite layouts. If you need more love inspired projects, stop by Practical Scrappers to see some Valentine's cuties and share the love.

Love & Crafting,
Karen XO

Tuesday, 28 January 2014

Chalkboards are Everywhere!

It seems as another trend has swept the land. The "Chalkboard look" is everywhere. I chose to mimic the chalkboard look by using Core'dinations paper. If you are unfamiliar with this paper, the core color is different from the top layer so when the paper is torn or sanded, the core color is revealed to make a striking contrast. My paper was black on one side and lilac inside. To achieve my chalkboard like stars, I placed a chipboard star under the page and carefully used a nail file to sand away the top black layer. The result is a soft outline of the star with a chalk-like effect. Finally, I added a few extra scratches and smudges to give the appearance of chalk dust haze.  Stop by Practical Scrappers today to see what the lovely ladies have been up to. You are sure to find some inspiration.

Friday, 22 November 2013

New Site Address

If you follow Practical Scrappers, 
please update your bookmarks to include their new web address.
Thanks

Tuesday, 24 September 2013

Ten Things Tuesday: Doilies

Practical Scrappers Design Teams brings you another Ten Things Tuesday. Today we feature doilies with all their wonderful intricate vintage detail. I used a subtle doily print background paper & mock paper doily embellishments to enhance the layout. Tip: cut doilies in half and tuck them behind other layers, place them in clusters, or place them to appear they are going off the page. Check out the girls at Practical Scrappers to find other ideas using doilies.
.

Tuesday, 17 September 2013

Afraid of Stickers?


I generally do not use stickers because ...
1. They are flat and dull. 2. They are difficult to work with because you only have one chance to put them in the right spot. Stickers by definition are sticky and are therefore unforgiving if you change your mind and try to remove them. They are easily damaged or damage the surface of your project.

I discovered this helpful trick and now I don’t avoid using stickers. I find it less stressful to use stickers in a project if I first stick them to acetate or cardstock and then cut them out. Stickers become embellishments that I can play with and easily move around until I am pleased with the design. Then I don’t have to worry about dropping them, bending them, or adhering them at the wrong angle. For my layout, I stuck flowers & leaf stickers to a piece of transparency and then cut them out. In order to go from flat to fabulous and create a more 3D life-like appearance, I only applied the adhesive to the center of the flowers and gently bent up the petals. Taking the extra step of adhering and fussy cutting your stickers really helped eliminate the problems that stickers always caused me and now allows me to use all those stickers that went ignored & forgotten.
Visit Practical Scrappers to see other ideas using stickers.

Tuesday, 10 September 2013

White Gel Pen


It is Ten Things Tuesday at Practical Scrappers. This week the Design Team was challenged to use white gel pen. Since I stamped the pair of owls to patterned paper, I then colored their eyes to make them pop. I also accentuated little details by adding stitching lines and dotty outlines to plain paper embellishments. There is a lot of subtle rubber stamping on this layout. I stamped swirls, sentiments, & flowers on acetate which allowed me to arrange them perfectly without the fear of having a disaster during stamping the image.

Monday, 2 September 2013

Stamping Fun!

Practical Scrappers is back with a Ten Things Tuesday feature on rubber stamping. For my sophisticated birthday card, I embossed a floral border directly onto acetate, as well as, a delicate flourish.  I used mini brads to adhere the acetate to the card base.  Then I stamped a large flower onto organza fabric and assembled multiple layers of organza & netting.  Finally, I hand stitched the layers together slightly gathering them for a fuller ruffled petal affect.  The top layer of the flower was stamped onto acetate so I could attach small silver accents to the flower’s center.  Stop by PS today and find some amazing inspirational projects.


Tuesday, 27 August 2013

Staple It!

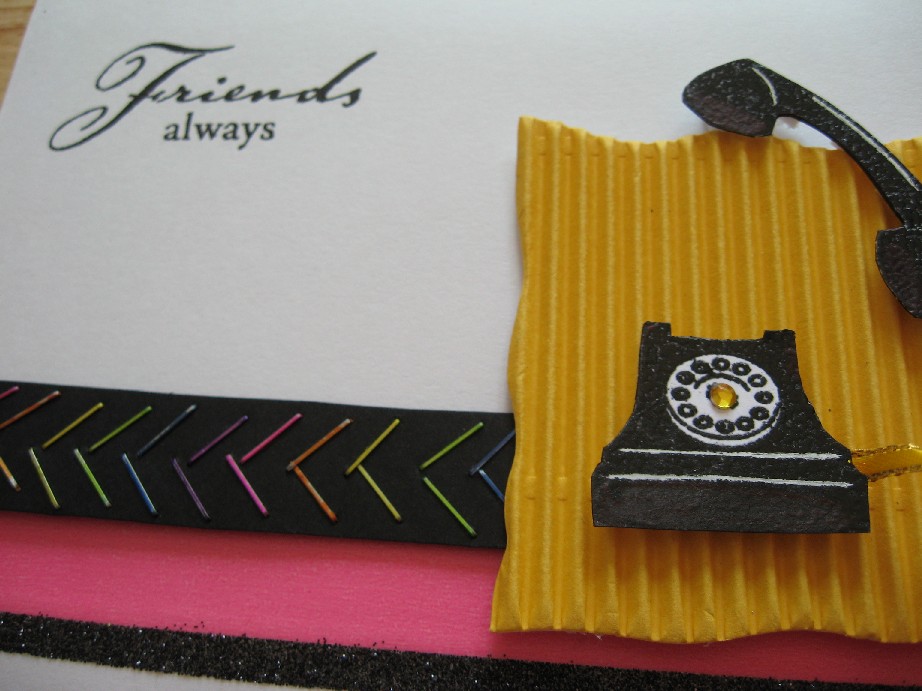
I used colored staples to form a chevron border on this cute friendship card. 

Through careful placement of the mini stapler, I was able to build a chevron pattern. After I stapled each pair of chevron sides, I changed the color of staples. Alternating staples was a bit time consuming but I was pleased because it created such a terrific effect.


Take a peek over at the Practical Scrappers Blog to see what the Design Team has been up to using staples.

*FYI – I nearly used the back of the staple with the bent metal ends because it created a pretty pattern.

Friday, 23 August 2013

Woo Woooo! (WOOD)


"All Aboard"
the Practical Scrappers Blog Train

Hop aboard this Choo Choo to find lots of great ideas & inspiration using wood.

Welcome to the Practical Scrappers/Paper Secrets Blog Hop!  We are so excited to have you here today!  For this blog hop we are featuring the Ten Things Team from Practical Scrappers and members from the Design Team at Paper Secrets. Our topic for this hop is a fun, trendy one that will definitely catch your attention: wood! We have a collection of wood goodies from Paper Secrets to give away and you can get all the details on that below, but first here's the list for the hop!

Blog Hop List
Karen Sessions (you are here!)

Here's what you can win from Paper Secrets!

You can do any or all of the following to get entered:
1) Be a follower here at Practical Scrappers
2) Be a follower at the Paper Secrets Blog
5) Leave us a comment here telling us which of those you did :)

You have until 11:59 PM CST on Sunday, August 25th to enter.
A winner will be announced early next week!

 Do stop by and visit all the ladies blogs and gather some great ideas along the way.
If you get lost, return to Practical Scrappers to rejoin the Blog Train.

For my layout, I used colored wooden matchsticks which are most likely recognized as a kid's craft. They are thin enough so they won't add too much depth to your projects and “wood” easily work well on cards. Once I noticed I had all the colors of the rainbow, my project for a rainbow theme took off. I knew gluing individual matchsticks would be fiddly & time consuming so after I placed them in the order I wanted, I simple put a strip of double sided tape down to hold them all together. I assembled about 2 inches of matchsticks at a time and found them quite easy to work with once glued together.  I carried our “wood” theme to the extreme by embossing the background paper with woodgrain as well as using a woodgrain alphabet for the title. I hope I have inspired you to try something new with wood and maybe even raid your kid’s craft stash. Your next stop on the Blog Hop is Kelly Holfield.

Here are some close ups of my project.


Your next stop on the Blog Hop is Kelly Holfield
Thanks for stopping by.

Thursday, 22 August 2013

"Wood" You Join Me?

Practical Scrappers Design Team has a special Blog Train planned for August 23-25.
  All the projects will feature wood.  Make sure not to miss one stop.


Tuesday, 20 August 2013

The "Eyes" Have It

Today's topic: Eyelets. When I think of using eyelets it is primarily for the hole at the top of a tag or put in a row with the intention of lacing ribbon through them. For my layout I simply used them as an embellishment in place of a rhinestone or brad. I used yellow eyelets as centers for the orange daisy flowers as well as a couple scattered along the edge. Visit Practical Scrappers to find other fun things you can do with eyelets.

Tuesday, 13 August 2013

Smear, Smudge, Splatter...

It’s time to get MESSY and create a cool new background. 

I used Vaseline to serve as a resist which I applied directly to the background paper. The Vaseline acts to seal the original paper by protecting the pattern from the paint. My original patterned paper was maroon with lime green vine design. I decided what area of the paper I wanted to remain true and then used my finger to apply the Vaseline Next, I applied yellow acrylic paint over the entire background page with a sponge brush. I brushed on the paint using light strokes going over the areas with Vaseline too. After the paint has dried, I used a baby wipe to remove the Vaseline to reveal my new altered background paper. I did not attempt to create a pattern or distinguishable shape when applying the Vaseline. My goal was to create a distressed & peeled paint appearance. I find this technique useful when I have a patterned paper that I don’t really like. If the pattern or color is not to my taste, I can alter it with Vaseline & paint.
Visit Practical Scrappers today to see more tips and tricks with paints. (and don't be afraid to get MESSY!)


Tuesday, 30 July 2013

Drowning in Flowers

Flowers are my all time favorite embellishment and it is rare that I can manage to complete a layout without them. I selected flowers in all sizes and styles to create this rainbow around my frame. However, since I didn't have any dark blue flowers, I inked some white flowers to complete the color range. You can easily  alter paper flowers with inks, mists, or chalk to suit your project. Visit the ladies at Practical Scrappers to see more ideas on what you can do with all those gorgeous pre-made flowers you have in your stash.


Tuesday, 23 July 2013

Fun With Letter Stickers

What can letters be used for except for titles and what can you do with all those mostly used ABC sticker sets when you’ve used up all the vowels? If you don’t know, then stop by Practical Scrappers today and be inspired to think outside the box. 
I used letter stickers as a mask.  After I stuck my letters down, I used a spotty stamp and brilliance ink to stamp over the top of the stickers.  When I was satisfied that I had a dense enough background of dots, I removed the stickers to reveal the word.  Actually, I made my letters of washi tape because I knew that washi tape is easy to remove. I was very pleased with the confetti-like background for this trendy wedding card so I experimented with inking a rainbow colored confetti background.   

I hope to look at my collection of background stamps and try different patterns when I use this masking technique again.  (tip: Before removing the stickers, make sure that there is no wet ink clinging to the slick surface of the sticker that will smear onto your project by carefully laying a tissue over the area and gently blotting.)