Welcome... Today I am sharing my mini wall hanging using a Linnie Blooms
long blank canvas 5"x11". I created this meadow silhouette in a rainbow of bright
and cheery colors perfect for summer home decor.
Pre-Preparations:
To create the meadow silhouette, select stamps of flowers & leaves that have a solid image rather than ones that have a line image outline. Prepare the canvas by securing it to the cutting matte or work surface using masking tape. I wanted to protect the very edge so that it served as a frame and remained plain un-inked canvas. To prevent disappointment, you may want to practice stamping the meadow silhouette design on paper first in order to work out the placement of your stamps. Prior planning prevents poor performance!
(TIP: If you only have detailed flower stamps, it is still possible to use them. Stamp the image and then fill in the outline by painting it solid black. This is more time consuming but you can achieve the look of a silhouette.)
Directions:
1. First, mist the canvas with water before you begin. Use a sponge applicator to blend distress inks or mists on the canvas. I chose to keep green at the bottom edge and blue at the top in order to emphasize the grass and sky. Allow the canvas background to dry thoroughly before stamping on it or dry it with a heat gun.
2. Next, apply an even coat of black acrylic paint to the stamp surface and begin to build the scene from the bottom up. If you find that the image has not stamped completely solid black, go back with a small detailing paint brush to fill in any whitish areas. I found that varying the intensity of the black silhouettes gave more dimension to the finished piece.
3. Finally, carefully remove the masking tape (the paint may not have dried on the tape surface) Embellish the wall hanging with butterflies and attach an inspirational word to the lower portion. Lastly, attach ribbon loops 2cm from the corner of the canvas. Insert a stick or dowel through the loops and tie on a cord for hanging.
A Closer Look:
Linnie Blooms Shop HERE
Linnie Blooms Supplies: 5x11' long blank canvas
Other Supplies: Distress Inks (Ranger: Dusty Concord, Faded Jeans, Peeled Paint, Spiced Marmalade), spray mists (Starburst Stains: Belles of Ireland Green, Peony Scarlet Red, Bachelor Button Blue, Yellow Rose of Texas), sponge applicator, Tim Holtz Nature's Elements clear stamp set CSS27836 (Stampers Anonymous), Meadow clear stamp set (Inkadinkado,) Tall Grasses rubber stamp set (Stampin' Up), daisy silhouette rubber stamp (Stampin' Up), black acrylic paint (Ceramcoat), paint brush, metal embellishment (Colorbox), Butterfly Mistables (Studio Calico), wooden butterfly, gems, ribbon, dowel, cord
Monday, 31 August 2015
Wednesday, 26 August 2015
Off the Page - Gift Bag
Welcome, I hope you have enjoyed the Design Team's "Off the Page" projects
featuring Paper House products. For my project, I transformed a plain
gift bag. I re-purposed a popular clothing store's shopping bag into
this fun birthday gift bag. With the huge variety of Paper House themed embellishments, you can make a personalized gift bag for
any hobby, holiday, or occasion.

Here's how I did it!
Directions:
1. The first step is to apply a strip of
coordinating washi tape along the top edge of the gift bag so that it
will have a nice neat & durable finished edge. Open the gift bag and
place a small plastic box inside the bag so that you have something
firm to press against while attaching the washi tape. Start applying
the washi tape inconspicuously on the side panel of the bag so the join
is not obvious. Allow half of the width of the tape to overhang the
edge of the bag. Next, clip the four corners of the washi tape up to the
edge of the paper bag. Then begin to fold the washi tape over and stick
it to the inside of the bag. 2. Cut out one cupcake from the Little Lady 8" paper pad and apply texture paint over the icing. Before the texture paint dries, sprinkle small beads over the wet paint. Then gently press each bead half way into the icing using a toothpick so that they are embedded and will be firmly attached when dry.
3. Next, cut out and attach a cherry to the top of the cupcake. Assemble the cupcake topper by mounting it on a scalloped circle and then attaching it to a bit of patterned paper and again onto white cardstock.
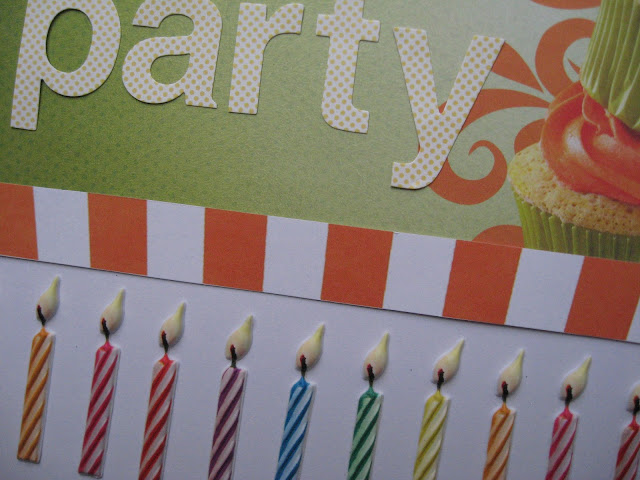
4. Finally, assemble the gift bag front by attaching the cupcake topper onto the 8x8" cupcake paper. Then embellish the bottom edge of the gift bag with a border strip and a row of Candle Puffy Stickers. Lastly, personalize the gift bag with a special message or perhaps add their name using alphabet stickers.
TIP: Don't forget to decorate both sides of the gift bag and make a matching gift tag.
A Closer Look:
The photo quality Puffy Candle Stickers have a unique look and feel, and have incredible detail with multiple levels of texture which make them irresistible.
 |
| Check out the Puffy Candle Stickers HERE |
Supplies: Little Lady 8" paper pad (Paper House), Candles Puffy Stickers (Paper House), chipboard scalloped circle, washi tape, Snow Writer Texture Paint (DecoArt), beads, alphabet stickers, gift bag
Visit Paper House to see their whole fantastic range.
PS: Don't forget to visit the Paper House Blog for the last three days of "Off the Page" projects. Thanks for Visiting!
Wednesday, 12 August 2015
Sympathy Cards
When words are not enough for the most difficult times, a handmade card
conveys love & concern and sends much needed comfort.Directions:
1. Begin to make the background by holding the feather mask firmly in place while gently sponging ink around the edge. Carefully remove the mask, reposition it, and continue sponging. Continue to add more feathers making sure to vary the direction & size of the feather. Also, be sure to place some feathers going off the edge of the paper.
2. Next, make the focal point feather by using the stencil and a darker color ink. Place the stencil down and while holding firmly, sponge the center. To add a bit of shading, use a darker shade of ink around the edge of the stencil and blend it by drawing the sponge towards the center of the feather.
3. Next, add a border strip of embossed feathers. Use a glitter gel pen to add a subtle sparkle to highlight parts of the embossed image. Then add a sentiment of condolence.
4. Finally, stamp a delicate flourish pattern over the canvas feather and add a hint of color by sponging ink along the edge. Lastly, use the stencil to cut a paper feather and embellish the card by forming a cluster using a combination of a real feather, vellum feather, or paper feather.
A Closer Look:
Linnie Blooms Supplies: feather stencil and mask, canvas feather
Other Supplies: pigment ink (Brilliance -Pearlescent Lavender, Purple, Sky Blue, Platinum Planet) (VersaColor - Polar Blue) (Studio G -lilac, rose, acua), condolences sentiment rubber stamp (PSX F-2562), Flourish Background cling stamp (Hero Arts), feather stamp, feather embossing folder (Darice), vellum, sponge applicator, feather, Stardust Glitter Gel Pen (Sakura)
Shop Linnie Blooms - HERE
Tuesday, 11 August 2015
Cards for Kids
Jungle Animals Gatefold Card
Step 2: Open Left Side Panel
(I couldn't resist forming the complete back panel too!)
A Closer Look:
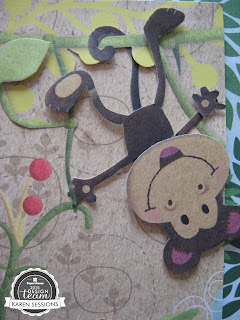
I used mainly two papers to construct this gatefold card: Into the Wild & Jungle Friends. I fussy cut around the animals and then used the remaining paper to create the background scenes. Both inside flaps were made with a 6" sheet from the Little Animals pad. I used foam mounting tape to raise the elephant & monkey's head on the front of the card, as well as, some jungle leaves and the bird. On the inside of the card, I cut around the lower portion of the elephant's ear and carefully inserted a bit of foam tape to lift it give it more dimension. The elephant and sun overhang the edge of the card. To make the animals a bit friendlier, I added pink cheeks to them using chalk. Finally, I added some additional leaves made with a small paper punch to bring a unifying cohesive element to all the scenes.
Supplies: Jungle Animals Gatefold Card
Monday, 3 August 2015
Coming Soon - 3 New ColorWays Collections!
They have revealed the three new ColorWays collections at Paper House.
Orchid - purple Rouge - red Gatsby - gold
Of course, they also have the corresponding embellishment packs, as well as, new rub on transfers and puffy sentiment stickers. Visit Paper House for their big reveal.
Orchid Sneak Peek
Gatsby Sneak Peek
Rouge Sneak Peek
Orchid - purple Rouge - red Gatsby - gold
Of course, they also have the corresponding embellishment packs, as well as, new rub on transfers and puffy sentiment stickers. Visit Paper House for their big reveal.
Orchid Sneak Peek
Gatsby Sneak Peek
Rouge Sneak Peek
Subscribe to:
Posts (Atom)


