Monday 27 July 2015

Canvas Sunflower- Mini Album Cover Embellishment

canvas sunflowers + inking + rubber stamping = lots of fun
This little denim album was one of those projects (and we all have them) that got left incomplete and abandoned when creativity took me in another direction. It was too plain for me to leave it just denim and I didn't know how to embellish it until I made this really easy canvas sunflower for the finishing touch.  Let me show you how I made it.

Directions:
1. Coloring the Canvas: Iron all the canvas pieces. Prepare your work surface & protect your hands with disposable gloves. Place the canvas sunflowers on your craft matte or newspaper. Using a sponge applicator to apply Distress Ink to color the sunflower and apply strong pressure to allow the ink to absorb into the weave of the fabric. Remember to color both sides of the canvas flowers as they will be folded to construct the 3D flower. Set flowers aside to dry thoroughly or give them a bit of help and dry them with a heat gun. Color the canvas leaves with Distress Ink. I suggest applying multiple shades of green & yellow ink to the leaves unevenly (aka splotchy) in order to give the leaves a more realistic appearance.
 
2. Stamping the Design: Use permanent ink to stamp a background pattern to the canvas sunflowers and leaves. Remember to stamp details to both sides of the canvas flowers as they will be folded to construct the 3D flower. I used a wood grain stamp to cover the petals.

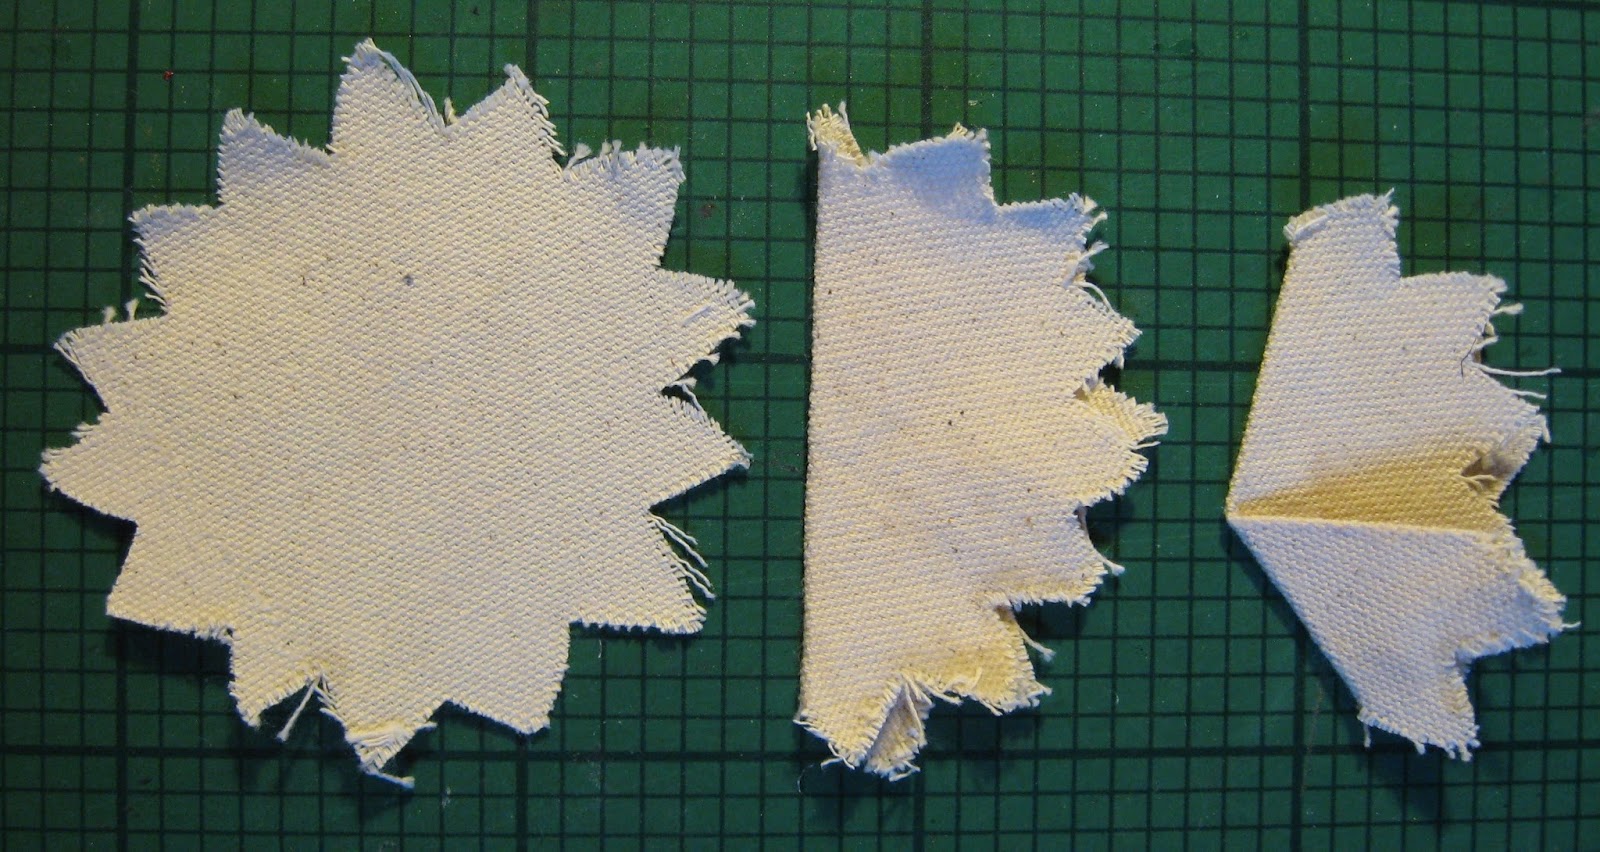
3. Folding:
  (you will need 3 canvas sunflowers)
Fold the sunflower canvas in half and press with your fingers while holding it for 20-30 seconds to set a mild crease in the canvas. Next, fold 1/3 of the folded sunflower over to form a small petal. Repeat the process of folding for the remaining two canvas sunflowers. You should have three identically folded pieces which when laid side by side form a complete circle.    
 

 4. Sewing: Use a needle and thread to tack the fold at the center and stitch it securely to prevent it from unfolding. Repeat the process of securing the fold for all three canvas sunflowers. Next, begin stitching the petals together at the center point to form the sunflower. There is no need to overlap because the three segments will form a circle when joined. Finally, embellish the center of the sunflower with a button and attach the canvas leaves to the underside of the sunflower. (Optional: If desired, sew a ladybug button on the sunflower.)

5. Inking the Edges: When the sunflower is stitched and assembled, use a sponge applicator to apply Distress Ink to the tips of the petals to add depth and dimension to the sunflower. (Vintage Photo & Spiced Marmalade)

6. Assemble the Project: Glue or stitch your sunflower to embellish your chosen item. You may embellish a candle holder, a gift bag, a hat, or a journal cover...etc.

A Closer Look:

Linnie Blooms Supplies:
canvas sunflowers, canvas leaves
Other Supplies: Distress Inks (Peeled Paint, Mustard Seed, Vintage Photo, Spiced Marmalade) -Ranger, sponge applicator, StazOn brown ink (Timber Brown) -Tsukineko, woodgrain clear stamp (Architectural Accents) -Tattered Angels, Papermania leaf clear stamp -Docrafts, wooden button, needle & thread, glue gun, iron

Stop by Linnie Blooms to see the amazing selection of canvas die cuts
and don't forget to follow Linnie Blooms on Facebook.

Thursday 23 July 2015

Summer Blog Hop!!!

Welcome.... to the Summer Blog Hop Extravaganza hosted by Paper House Productions!

       This lovely photo of my friend's silhouette on the beach with her hubby just grabbed me from the second I saw it. It was the perfect choice for our Summer Blog Hop extravaganza. I hope you enjoy my layout called, Sun Kissed.
If you'd like a chance at winning a Summer Beach Prize Pack from Paper House worth $100, then make sure to visit HERE to enter.

A Closer Look:
 

Directions:
1. Apply a light dusting of brown chalk to the edge of the canvas file folder and matte the central photo on it. Stamp the word "beach" on the tab. Attach the photo cluster to the 8x8 yellow paper overhanging the edge.

2. To add more layers and depth to the layout, carefully cut out the palm trees, fringe the edge of the leaves, and mount them on foam tape for a more realistic look. Also, cut palm tree silhouettes from black cardstock and adhere them behind the photo cluster.

3. Create a mock horizon by layering a strip of torn tan paper (sand) on top of the ocean paper (water). Arrange them to go behind the main photo to create the appearance of the horizon.

4. Next, stamp seashells on shrink plastic using copper & gold ink. Now stamp the palm tree onto shrink plastic and color if desired.  Carefully, cut around the images and use a heat gun to shrink. (TIP: If you want to make a charm that hangs, punch a small whole with a paper punch before you shrink the image.)

5. Finally, embellish the layout to create the beach scene with seashell buttons, starfish, flip flops, swim suits, sunglasses...etc  (I'll warn you now, I confess...I am an over-embellisher!)

Supplies: Emerald Mini Trim Cards 12" ColorWays -Paper House, At the Lake Wood 12" -Paper House, Little Girl & Little Man 8x8 paper pad -Paper House, ColorWays Sapphire Trim Cards 12" scrapbook paper -Paper House, Endless Summer Snapshot Stickers -Paper House, Sunshine & Nautical Cork'd Stickers -Paper House, Our Big Adventure Cardstock Stickers -Paper House, Canvas Mini File Folder -Linnie Blooms, Summer Collection Wood Veneer -American Crafts, Ornamental Shells Stamp Set LL732 -Hero Arts, Palm Tree rubber stamp -Stampcraft, clear shrink plastic -Shrinkles, copper & gold ink -Brilliance, heat gun, black cardstock, seashell buttons -Dress It Up, plastic palm leaves, burlap fabric, StazOn black ink -Tsukineko, chalk -Inkadinkado

Visit Paper House to see their fantastic range of
beach & seaside papers & embellishments.


                  Return to Paper House for the full list of
                            Summer Blog
Stops.

Monday 20 July 2015

Summer Blog Hop Begins!


Find your flip flops, put on some sunscreen, and grab your shades, there is a week of HOT projects ahead!
  2015 Summer Blog Hop
July 20-24 n
 

Today the Paper House Summer Blog Hop begins. Paper House is giving away a Summer Beach Prize Pack worth $100! Don't miss out on winning this huge prize so make sure to stop by and enter HERE to win.

Come back and visit me on Thursday, July 23 when I share my beach layout.

Sunday 19 July 2015

CREATE Magazine July 2015


CREATE Magazine July 2015 by Scrapbook Generations is now out. You will find some amazing inspiration in this free magazine. I have two projects featured this month. My Bachelorette tag can be seen on page 273 and my double page layout is on page 260. Here is a sneak peek.
You will find the complete CREATE Magazine July 2015 HERE.

Monday 13 July 2015

Coming Soon...Summer Blog Hop Extravaganza!


The Paper House Design Team has been hard at work preparing for our Summer Blog Hop beginning next week. Don't miss out... you are sure to find some inspiration for all your summer vacation pics...and best of all, there are some fantastic giveaways from Paper House.


Grab your flip flops and get ready to HOP!
  Summer Blog Hop
July 20-24

Friday 10 July 2015

Smiles for Daddy!


After spending a week away from home on a work assignment, we captured this special moment between father and son being reunited. Only Daddy has the power to get this giggle. The layout was inspired by a sketch from Alison Davis at CREATE magazine (May 2015).

A Closer Look:


Supplies:
British Prep 12x12 paper pad (Striped Tie) -Paper House, Picture Perfect & Hey You Cork Sticker Embellishments -Paper House, Dad 3D stickers -Paper House

Directions:
1. Select 3 photos and cut the main photo into a circle and matte it. Cut the 2 smaller photos into circles. Frame one of the smaller photos. Arrange your photos on the background paper.

2. Cut additional circles in complimentary papers with small prints. Layer the circles under some photos and adhere some circles extending off the page.

3. When adding the title to the layout, use different fonts/sizes/colors for each word to add interest. Substitute a narrow 3D embellishment to stand for an "L" in the word smile.

4. Finally, embellish the layout with some fun cork embellishments.

Visit Paper House to see their whole range of themed paper and unique embellishments.
.

Wednesday 8 July 2015

Christmas in July


Some of you may be aghast at the thought of Christmas in July and others of you may be early-bird planner types...I'm just moved to craft when inspiration strikes, so behold, my first Christmas card of 2015. Linnie Blooms canvas evergreen trees with their distressed edges just seemed the perfect fit for my rustic card. I stamped the clear stamp set of stitched doodles on the tree which was quick & easy and I am so pleased with the result.

A Closer Look:
Directions:

1. Use a sponge applicator to lightly apply Pine Needles Distress ink to the canvas tree.
2. Carefully separate your chosen doodle from the cluster with sharp scissors.
3. Cover the trunk with a bit of scrap paper. Ink the stamp with evergreen pigment dye ink and carefully press it to the canvas.
4. Continue stamping rows of doodles until the tree is completely covered.
5. Use a sponge applicator to lightly apply Vintage Photo Distress ink to the tree trunk.

TIP: Before beginning, I traced the canvas tree on paper and cut out a tree so that I could use it to practice. One set of doodle stamps are straight and the other is made on a slight curve. I selected the gently curving doodle so the tree would have a more realistic appearance.  It was very useful to test different doodle patterns to see how they would appear on the tree. I tried 3 other patterns before I selected the one in the final project. By taking the time and doing a test tree on paper, this pre-planning step can help you avoid frustration and disappointment.

Supplies:
canvas evergreen tree (Linnie Blooms), burlap printed fabric (Linnie Blooms), Stitched Doodles Stamp Set (Linnie Blooms), ColorWays Emerald Leatherbound 12" paper (Paper House), Little Man 8x8 paper pad (Paper House), Winter Wonderland Die Cut Sticker Embellishments (Paper House), Rub On Transfers (Paper House), Pine Needles & Vintage Photo Distress Ink (Ranger) - evergreen pigment dye ink - wood veneer tiny stars & snowflakes (Studio Calico), white gel pen (Sakura), christmas ribbon (Celebrate It), red half pearls


Something NEW at Linnie Blooms:
Check out the new program "BLOOMERS" There are some exciting new happenings and the Bloomer program is like no other!
  • Receive FREE Shipping on ALL of your orders.
  • Receive exclusive monthly project tutorials.
  • Receive an invite to our Annual Bloomer Convention where we will explore
  • different ways to create Linnie Blooms style!
  • 1% of all sales are donated to Mental Health Awareness
Joining is really simple! Make your purchase in the online shop and be sure to create your personal account. Upon checkout, enter the discount code: BLOOMME and you will receive FREE shipping on your very first order. When they process your order, they will add you to the Bloomer's Club and send you your membership card and info.  See all the BENEFITS so there is no reason not to join!