Wednesday, 29 April 2015

Last Day to Enter!

It's Your Last Chance!
Stop by the Linnie Blooms Blog Hop
and get some great inspiration.
Leave a comment as you hop and to be entered to
win
 a giveaway of $50 of Linnie Blooms products.

Join the LB Hop!

Monday, 27 April 2015

Daddy's Little Girl


All the Paper House papers and embellishments coordinate so perfectly that you just can't pick the wrong combination. The "Mom" paper collection worked wonderfully for my Birthday Tea Party layout. I used the 3x4 inch cards to create the look of a patchwork quilt with a "Project Life" style arrangement.


Paper House has the cutest little mini photo embellishments called Snapshots Stickers. I especially love the ones that have a paperclip attaching a cute little phrase accent.

A Closer Look:


Directions:
1. Use the PH Pink Floral 12x12 paper as the background. Cut apart the Mom Tags 12x12 paper and select 6 designs.

2. Distress the edges of the main photo with a sanding block. Cut a matte for the main photo. Use a scalloped edge circle punch to matte three embellishments.

3. Next, add your journaling to one of the Mom Tags. Use a white gel pen to add faux stitching details to some of the embellishments & papers.

4. Finally, embellish the layout. Tie a bit of baker's twine to the paper clip on the Snapshot Sticker Embellishments. Lastly, add glitter, mini pearls, gems, chipboard, flowers, & ribbon.

Paper House Supplies:
    12x12 scrapbook paper - Pink Floral & Mom Tags
    8x8 paper pad - Little Girl
    Baby Girl Diecut Sticker Pack
    Floral Snapshots Sticker Embellishments
    Little Princess 3D Stickers

Visit Paper House to see their whole range of Snapshot Sticker Embellishments.

Saturday, 25 April 2015

Linnie Blooms

If you haven't signed up for Linnie Blooms, you are missing out on some wonderful projects.


Tuesday, 21 April 2015

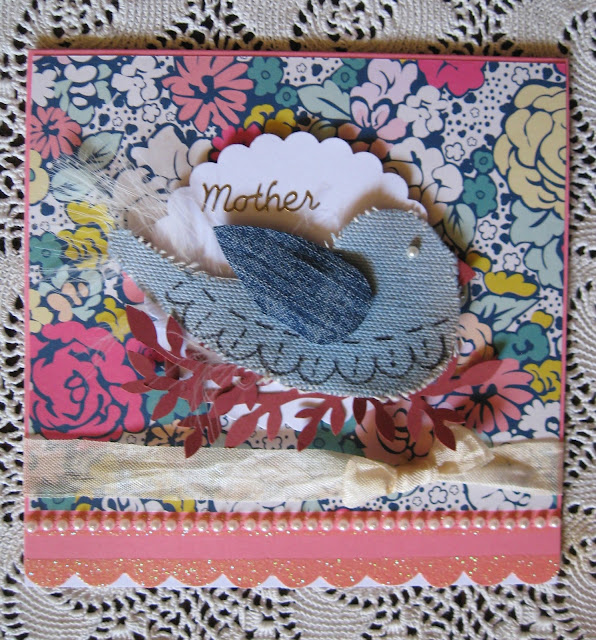
Blue Bird Card & Linnie Blooms Blog Hop

Hi, Thanks for joining us on the Linnie Blooms Blog Hop!
Everyone's thoughts are turning to spring and as Mother's Day is approaching in 2 weeks time, this feminine card checks all the boxes. Remember to celebrate your Mother on Sunday, May 10th.
You may have seen my card featured in Scrap n' Art Magazine June 2015.

Visit Linnie Blooms to see their range of wonderful canvas based products, as well as, stamps, stencils, and hand-dyed ribbons.  Do stop by and take a browse. Be sure to check out the Linnie Blooms website and follow us on the Linnie Blooms Facebook page for lots of inspiring ideas.

Directions:
1. Place the canvas bird on some newspaper or craft sheet. Mist the bird until well coated. If you prefer an even texture and want to avoid a splattered effect, spread the mist evenly over the fabric using your finger to work it into the rough weave.

2. After the canvas bird is dry, add rubber stamped details to it. I used LB Stitched Doodles Stamp and Ranger Archival black ink.

3 Embellish, the bird with a feather, a pearl for the eye, and add a wing. I cut the wing from denim jeans that were unwearable. Denim fabric is great to re-purpose.

4. Punch a scalloped edge circle and assemble the bird cluster. Attach pearl trim and ribbon to the lower edge of the card & finally, add a sentiment if desired.

(TOP TIP: To flatten LB canvas shapes that have been misted, iron them. When the fabric is almost completely dry, place it between 2 pieces of plain copy paper and iron.)

A Closer Look:


Linnie Blooms Supplies:  canvas bird, hand-dyed ribbon, Stitched Doodles Stamp Set

Other Supplies: Glimmer Mist -Denim Blue (Tattered Angels), pearls, feather, scalloped edge circle punch (Marvy Uchida), Archival black ink (Ranger), mounting block, iron


ALL ABOARD the LB Blog Train.

You won't want to miss a single stop on the Blog Hop.  

Enjoy the journey!

Karen Sessions  (you are here)
Leave a comment on each blog so you can be entered into the giveaway!


LB Blog Hop

ALL ABOARD the Linnie Blooms Blog Hop!

If you participate you will be entered into our
random drawing for $50 in FREE Linnie Blooms product! That's a LOT of product! 

You won't want to miss a single stop.  Begins April 22

Monday, 20 April 2015

Linnie Blooms New Line!

LB is getting ready to release an all new product line in May! Zulily will be featuring Linnie Blooms new product line during a 3 DAY SALE on their site in May!  There will be FIFTY different kits.  Sales dates will be announced soon.

Thursday, 16 April 2015

Paper House SALE!

The word is out!  20% off all Snapshots™

 
Visit Paper House now through April 30th.


They've made 18, count 'em, 18 different designs. You are sure to find one for every project!

Friday, 10 April 2015

Thank Heaven...

Thank Heaven for Little Boys & Paper House products!
Hi There!
My little nephew Colin is the star of the show today. He was the perfect model to show off the Baby Boy Diecut Sticker Pack. The super bright colors and glitter accents make the page super fun.

A Closer Look:


Directions:
1. Use the PH 12x12 paper as the background. Pierce holes in the edge of a scalloped white paper with a needle and stitch a boarder with embroidery thread. Pierce holes along the edge of the 6x6 with a needle and stitch a boarder with embroidery thread. Adhere the papers and photo to the background.

2. Select one feature embellishment and pierce holes in order to add some stitching details.

3. Next, select and arrange the embellishments. Mount the main embellishment using foam tape.

4. Lastly, make 3 mini flags and adhere them around the main embellishment and add a few scattered buttons to finish the layout.

Visit Paper House to see their whole range of fun embellishments.

Paper House Supplies: 12x12 scrapbook paper - Teal Chevrons
                                       6x6 paper pad - Little Animals
                                       Baby Boy Diecut Sticker Pack