Saturday, 27 August 2016

Creative Embellishments - August Challenge

Calling all challenge lovers! 
There is a new challenge this month at Creative Embellishments and there is a really cool prize to be won.  As usual, you must use at least one element from their picture prompt to be inspired and with an additional twist to also use something circular on your project.  Create a NEW project: layout, mini album, tag, or card as of August 1, 2016.  Next, make a blog post sharing your project and then visit the CE Blog to add your entry to the InLinkz box to be eligible for the prize. So get going...there is still time to enter.
                                                 The deadline to enter is August 30.

                                                     Window Kitty Spider Web Card
I was inspired by the starry sky in the picture prompt to create my stamped Halloween card featuring a kitty, his jack-o-lantern, and some friendly spiders.  The luminous moon (my circular element) overhangs the edge of the card and was stamped with a humorous sentiment. The starry sky was stamped and heat embossed with silver. Next, various blue alcohol inks were applied over the stars.  All the elements were stamped except the spider web which is a svg digital cut file.  Finally, the little spiders were stamped onto transparency and black gems added for their bodies & heads.  The top spider dangles from a sparkly fiber and adds a fun kinetic element to the card.

 
 Hot Air Balloon Card
I still had more inspiration and wanted to do a card with a hot air balloon and luckily my friend lent me her stamp as it had a circular balloon. I used many beautiful shades of hot pink which complimented the breast cancer awareness theme.
where you will find all the details and the picture prompt.

Tuesday, 23 August 2016

Craft Ideas Magazine - Fall 2016

Starting today, Craft Ideas Magazine (Fall 2016) is in stores.
Visit www.Craftideas.com for How To's & Giveaways

Now, for a little sneak peek...
Check out page 66 to see my Halloween card.

& visit page 70 to see my friendship card.
The full set of directions can be found online at
Craft Ideas

Sunday, 21 August 2016

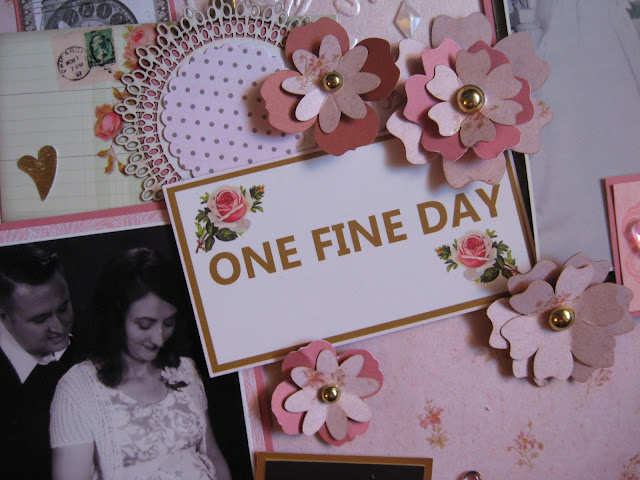
One Fine Day Layout - The Robin's Nest

Today is my turn to share a project for The Robin's Nest.  Drop by to see my girly layout where I celebrate my sister's marriage and her blossoming family. My layout features photos that were taken 10 years apart; first, as they began their life together and also as they welcome the arrival of their first child. The delicate pinks and vintage embellishments were the perfect compliment to celebrate the joys of womanhood.

Here is sneak peek...
https://chatteringrobins.blogspot.co.uk/2016/08/one-fine-day-layout.html
                        To see the complete tutorial go to...The Chattering Robin's Blog.

Supplies:

The Robin's Nest Supplies: Discovery Girl Glitter Cardstock, Rosy Diamond Cardstock (reverse side pink spots), Black Daisy Glitter Stripe Specialty Paper, Lodge CutOuts Cardstock, Doillie Die Cuts, Rosy Cards, Rosy Die-Cut Flowers, Dew Dew Glue, Heart Dew Drops, Pearl White Diamond Dew Drops, Aquamarine Diamond Dew Drops, Pink Punch Dew Drops, Metallic Gold Dew Drops, Pink Glitter Journaling Blocks

Other Supplies: tree die cut, lace rubber stamp, silver ink, heart embellishments, Rosa Embossing Folder (Cricut Cuttlebug), pink pearlescent cardstock, transparency, Versamark Watermark Ink Pad (Tsukineko), woodgrain stamp (Recollections), gold embossing powder (Stampendous), Heat Gun (Ranger), dimensional foam tape

                  To purchase these pretty pink papers and embellishments, visit The Robin's Nest.

                                 For more inspiring paper-craft projects from the Design Team,
                                      be sure to visit us often at The Chattering Robin's Blog
                                                           and follow us on Facebook.
                                                                Thanks for visiting!

Sunday, 7 August 2016

Captured Layout - The Robin's Nest

I just love baby pink & black together and when the Design Team was told our focus this month is on all things Girly, I was thrilled. I had the perfect Robin's Nest papers & embellishments in mind to make a layout about myself. If you love the color scheme as much as I do, then head over to The Chattering Robin's Blog today to see my post and complete tutorial.     


Shhhhhhhhh...It's a Sneak Peek!

Robin's Nest Supplies: Rosy Diamond Cardstock (reverse side pink spots), Obsidian Diamond Dew Drops, Coral Diamond Dew Drops, Black Dew Drops, Neon Pink Mini Dew Drops, Dew Dew Glue, Rosy Stripe Cardstock, Girl Crown Glittered (reverse side stripe), Black Glitter Cardstock, Black Daisy Glitter Stripe Specialty Paper, Pink Glitter Journaling Blocks, Rosy Straw, Princess Glitter Word Titles, Doilie Die Cuts
                       
To purchase the supplies to make your own layout, visit The Robin's Nest.
For more inspiring paper-craft projects from the Design Team, be sure to visit us often at
The Chattering Robin's Blog
and follow us on Facebook.

Wednesday, 3 August 2016

Creative Magazine - August 2016 (Issue 12)

You've got to check out this free magazine from Turtle Soup. It is a collaboration of world wide creatives who share their projects freely in hopes of inspiring others.
Prepare to be amazed by all their talent. Enjoy the slideshow HERE.

                Creative Magazine - August 2016 (Issue 12)
This months challenge was to use the mood board "white plus one" or follow the theme of summer, fun, vacation, seaside, & sports.  I submitted four layouts which can be seen at 1min 27sec, as well as, two cards at 2min 57sec.


Once again, a huge thanks to our dedicated magazine coordinator, Bev Code and the Turtle Soup Design Team. Stop by Turtle Soup for more inspiration.


Sunday, 31 July 2016

Creative Embellishments July Challenge


I completed the Creative Embellishments July Challenge. To participate one had to use some aspect of this image to be inspired, as well as, include stars on their layout. I used the aqua blue background, red, white blue, and stars & stripes for this layout.
First, I embossed the background paper with a star embossing folder and then swiped a white ink pad gently across the paper. To give the bunting flags at the top of the page a little more dimension, I used a craft knife to carefully slice the edges and curl each flag up. Having the rosette hang off the page made a nice point of interest,  I finished off by using a white gel pen to add faux stitching details around the edge

A Closer Look:

to learn more about the upcoming August Challenge.

Friday, 29 July 2016

Joggles Funky Flowers


Hello Joggles Fans,
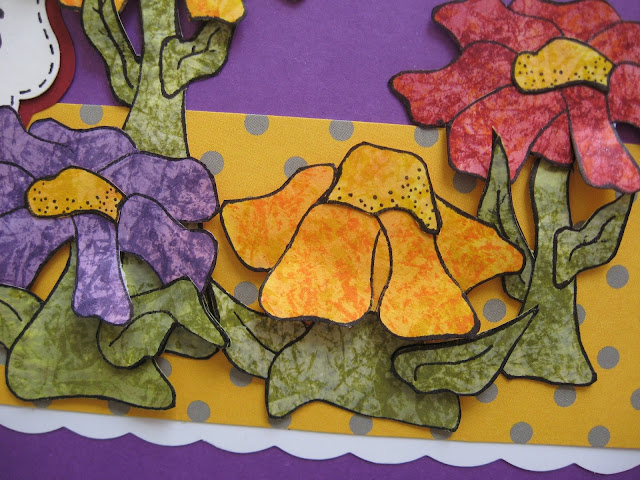
Today I'll be sharing a tutorial on The Joggles Blog today to create some whimsical and colorful flowers using Joggles Funky Flower Stamps and Tim Holtz Distress Inks.
Supply List:
Joggles / Virginia England Cling Mounted Rubber Stamp - Funky Flower #3 [56752]
Joggles / Virginia England Cling Mounted Rubber Stamp - Funky Flower #5 [56761]
Joggles / Virginia England Cling Mounted Rubber Stamp - Funky Flower #7 [56825]
Tim Holtz Distress Ink Pads -Aged Mahogany, Fired Brick, Mustard Seed, Spiced Marmalade, Shabby Shutters, Peeled Paint, Dusty Concord, Worn Lipstick
Inkssentials Mini Mister
Inkssentials Non-Stick Craft Sheet
StazOn Ink Pad Jet Black
Joggles Clear Acrylic Stamp Mounts
Ranger Heat It Craft Tool


Other Supplies: white cardstock, card base (5x7"), newspaper, White Gelly Roll Pen (Sakura), sentiment rubber stamp (unknown), yellow dotty cardstock - Seen & Noted - Take Note - 751321 (Pebbles Inc), permanent marker -black (Sharpie), Bracket Paper Punch (Martha Stewart)

A Sneak Peek:
https://karensessionsartandsoul.blogspot.co.uk/2016/07/joggles-funky-flowers.html
 https://karensessionsartandsoul.blogspot.co.uk/2016/07/joggles-funky-flowers.html
If you like what you see, head over to the Joggles Blog and see my complete tutorial.
To purchase the stamps and products to complete this project, visit www.joggles.com 
Have a great day!