Saturday, 10 September 2016

Perfect Pearls - Joggles DT - part 2


As promised, I have one more card to share using the same products and images but working on black cardstock which produces an entirely different but equally beautiful look. The color of pigment powder I used are different from the cards made on white cardstock in the previous post.
 
Joggles Supplies List:

Perfect PearlsPowder - Perfect Red

Perfect Pearls Powder - Perfect Gold
Perfect Pearls Powder - Perfect Copper

Joggles / Margaret Applin Designs Cling Stamp GardenParty #1 [56777]
Joggles / Margaret Applin Designs Cling Stamp Garden Party #2[56782]

Additional Supplies: Perfect Pearls Mists - Heirloom Gold (Ranger), Perfect Medium Ink Pad (Ranger), black cardstock, Metallic Gold Dew Drop Jewels (The Robin' Nest), ribbon, birthday sentiment, paint brush, card base 5x7"


Step By Step Tutorial:

1. Apply Heirloom Gold Perfect Pearl Mist to black cardstock.


2. Stamp image using Perfect Pearl Medium.


3. Apply Perfect Gold Perfect Pearl Powder to the center of the flower.
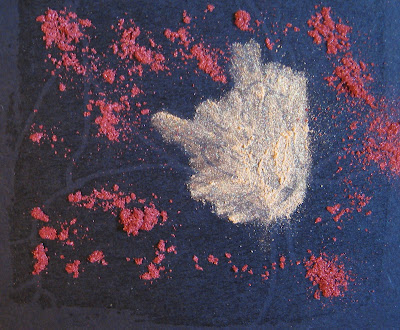

4. Apply Perfect Red Pearl Powders onto the petals of the flower.


5. Cover the entire image, blend powders, and remove any excess powder.


6. Repeat the steps and apply Perfect Copper & Perfect Gold Pigment Powders.


7. Attach the flower images vertically across the card,


8. Tie a faux bow with organza ribbon.


9. Attach jewels to the center of the middle flower.


10. Add a sentiment to the lower left corner.

A Closer Look:

All the supplies for this project can be found at
www.joggles.com

Friday, 9 September 2016

Sympathy Cards - Joggles Design Team

This week I was allowed to pick out the products that I wanted to use to create a project. I selected a beautiful stencil with leaf flourishes exclusive to Joggles and some lovely floral cling stamps by Joggles designer Margaret Applin called Garden Party. I thought I would use a different medium this week so instead of inks, paints, or mists, I chose Perfect Pearls Pigment Powders. If you have not seen Perfect Pearls before, they have a glorious "mother of pearl" luminous sheen which is almost impossible to capture on film.


Sorry...sneak peek only!
but head over to the Joggle's Blog for a complete step by step tutorial, as well as, a second card design with the same products.
Please stop by tomorrow when I will share a similar card using the same artistic stamps with Perfect Pearls Powders but stamped onto black cardstock.

Sunday, 4 September 2016

First Halloween - Robin's Nest Layout

A glittered moon and sparkling pumpkins don't distract from the glistening spider webs that haunt this Halloween layout.  There are so many little details not to be missed.

Robin's Nest Supplies: Spiderweb Glitter Cardstock, Pumpkin Glitter Chipboard, Limoncello Glitter Cardstock, Ivy Trim Cardstock, Red Snowflake Cardstock (plaid on reverse), Black Dew Drops 6mm, Halloween Dew Drops, Cherry Kisses Archival Seeds, Glitter Word Titles, White Alpha Stickers, Dew Dew Glue

Other Supplies: Black & Silver Permanent Marker (Sharpie), Black Gelly Rolly Pen (Sakura), Embossed Zig Zag Edge Paper Punch (Martha Stewart), Mini Spider Stamp (Studio G), StazOn Black Ink (Tsukineko), Holly Border Embossing Die - CTDI7051 (Crafts Too Cutting), transparency, mini star paper punch, green / brown / black cardstock, small leaves, sparkly embroidery floss, craft knife, cutting matte, 3D foam pads
 

You can find the whole tutorial HERE on to the Chattering Robin's Blog.

To purchase the supplies for this project, visit The Robin's Nest Shop.

For more inspiring paper-craft projects from the Design Team, be sure to follow us at

Thanks for visiting!


Monday, 29 August 2016

Rubber Dance - August Stamp Color Challenge


Rubber Dance - August Stamp Color Challenge
The Challenge: use black & white, plus one color of your choice. You absolutely must include stamping on your project. Don't worry, you do not have to use Rubber Dance stamps to participate. You might win a fabulous prize of Rubber Dance Stamps.

Here is my friendship card featuring two red daisies and stamped newsprint background with a torn edge.  The perfect finishing touch was the addition of white Dew Drop jewels to accentuate the center of the daisies.  I rarely if ever design on long narrow cards 4x8" but I should definitely do more of them.


For card #2, I stamped the background with Joggles Grunge Star Border Cling Stamp and then stamped dictionary definitions over the movie reel die cut from BoBunny.  I stamped small stars and heat embossed with black glitter.  Finally, I embellished the card with gems, Dew Drop Jewels, & mini silver star stickers.

Rubber Dance is still accepting submissions.  (deadline - August 31)
For all the specifics to enter the challenge, please visit Rubber Dance Stamps Blog.
The winners will be announced on September 5.

Thanks for stopping by!

Sunday, 28 August 2016

Lindy's Stamp Gang - August Challenge


Check out Lindy's Stamp Gang Challenge for August.  There is still time to enter and win a great prize. ($50 Gift Certificate!!!)  To be eligible to win, create a project inspired from the August inspiration board above using a minimum of two Lindy’s products.  Then make a blog post sharing your project.  Make sure to include links to Lindy's Challenge page and also links to the specific products you used.  You can find all the rules HERE.
Here is my card: Mother Bird with Nest.  I trimmed the corners to create a large tag shape from a a 4x8" card base.  I embossed the card with a beautiful flourish pattern and then applied Lindy's Starburst Ink Spray.  These three colors are part of the Prairie Wildflower Shimmer Set.
A Closer Look:
After I colored the bird, I used a paper punch to cut it into a circle.  Next, I added Peeled Paint Distress Ink lightly to the edge.  Then, I applied VersaMark Ink to the edge of the circle and heat embossed it with Lindy's Magic Moon Pearls Two-Toned Embossing Powder.  I also added embossing powder to the eggs to give them a luminous sheen.  Finally, I added yellow flowers that I stamped, heat embossed, & colored and then I embellished the centers with Dew Drops jewels from The Robin's Nest and gold micro beads.

Thanks for stopping by!

Saturday, 27 August 2016

Creative Embellishments - August Challenge

Calling all challenge lovers! 
There is a new challenge this month at Creative Embellishments and there is a really cool prize to be won.  As usual, you must use at least one element from their picture prompt to be inspired and with an additional twist to also use something circular on your project.  Create a NEW project: layout, mini album, tag, or card as of August 1, 2016.  Next, make a blog post sharing your project and then visit the CE Blog to add your entry to the InLinkz box to be eligible for the prize. So get going...there is still time to enter.
                                                 The deadline to enter is August 30.

                                                     Window Kitty Spider Web Card
I was inspired by the starry sky in the picture prompt to create my stamped Halloween card featuring a kitty, his jack-o-lantern, and some friendly spiders.  The luminous moon (my circular element) overhangs the edge of the card and was stamped with a humorous sentiment. The starry sky was stamped and heat embossed with silver. Next, various blue alcohol inks were applied over the stars.  All the elements were stamped except the spider web which is a svg digital cut file.  Finally, the little spiders were stamped onto transparency and black gems added for their bodies & heads.  The top spider dangles from a sparkly fiber and adds a fun kinetic element to the card.

 
 Hot Air Balloon Card
I still had more inspiration and wanted to do a card with a hot air balloon and luckily my friend lent me her stamp as it had a circular balloon. I used many beautiful shades of hot pink which complimented the breast cancer awareness theme.
where you will find all the details and the picture prompt.

Tuesday, 23 August 2016

Craft Ideas Magazine - Fall 2016

Starting today, Craft Ideas Magazine (Fall 2016) is in stores.
Visit www.Craftideas.com for How To's & Giveaways

Now, for a little sneak peek...
Check out page 66 to see my Halloween card.

& visit page 70 to see my friendship card.
The full set of directions can be found online at
Craft Ideas